
This is the final blog post in the “Improving Your Cell Phone Flower Photography” series. It was inspired by a workshop I did in the spring for the Montgomery (AL) Federation of Garden Clubs. They have an annual flower photography competition that coincides with their flower show.
The number one concern expressed by the participants was that the print did not look like what they saw in their phone cameras. I touched on one reason in the last post on editing: the difference in the brightness of phone camera screens. This can be solved with the understanding of the histogram and how to correct it in third-party apps. This post will address two more reasons one may be disappointed in prints from the cell phone photos.
Ratios
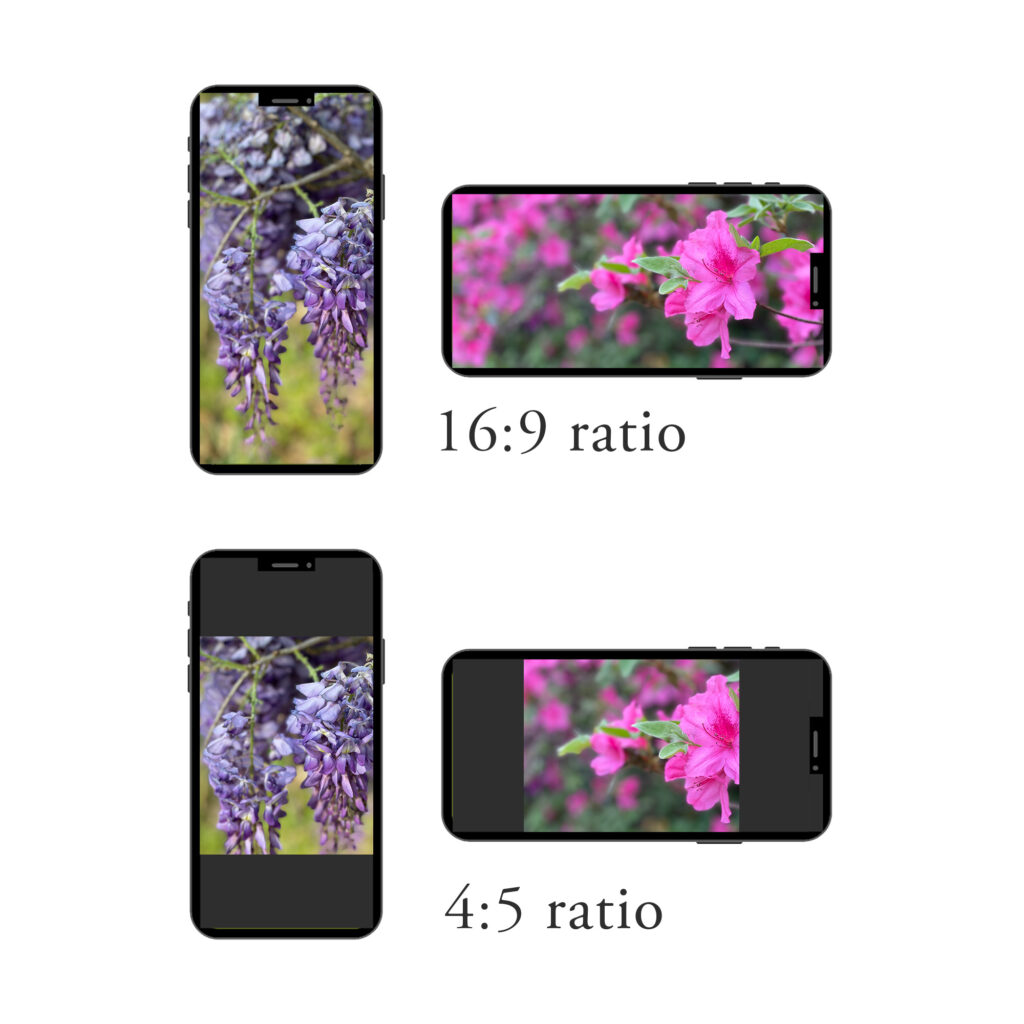
In photography, ratio refers to the relationship between the height and width of an image. There is no “best” ratio for an image. However, if your image is not the same ratio as the print size you choose part of your image may be missing from the print or there will be empty white spaces on the print.
Currently, the iPhone 14 Pro Max will allow me to TAKE photographs in these ratios (I think I remember being offered more options on the iPhone 12 Pro Max ?):
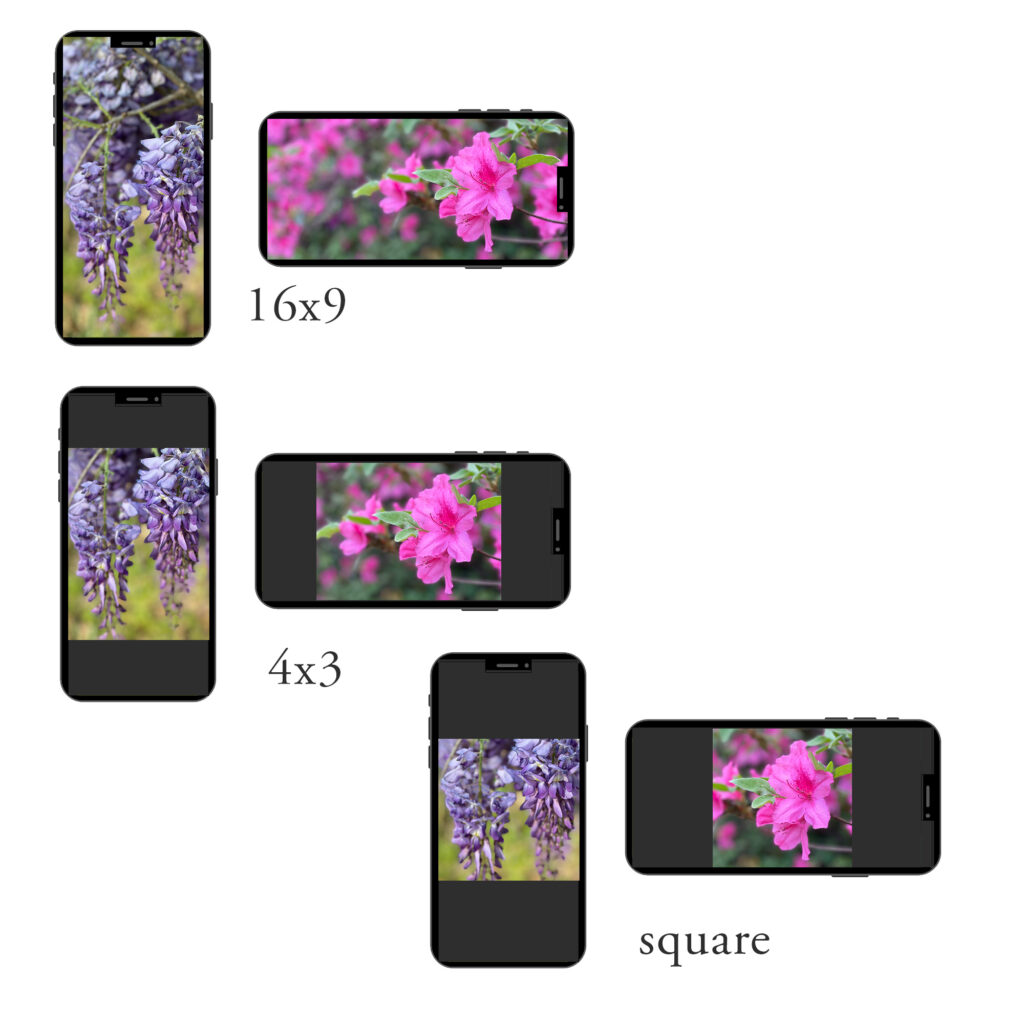
To find these settings in the iPhone camera app click on the ^ at the top of the screen, look at the circles at the bottom and the one with the numbers in it will open your choices. If you’re using an android or a different iteration of the iPhone you’ll need to find this option on your phone. Your phone may offer different or more options. Note that these numbers are ratios — not inches. Also note that these are not common print sizes. So to see how your image will look as a print you will need to open it in photos.
Click on “edit” and then the crop/rotate symbol at the bottom. Currently, the iPhone 14 Pro Max offers 10 options: 3:2, 5:3, 4:3, 7:5, 5:4, 16:9, wallpaper, square, freeform, original.
If you’re going to print your image as an 8×10 (the size required for entry in the Montgomery Federation of Garden Clubs contest) use the 5:4 ratio. Then you can adjust your crop to maintain your composition and focal point. But some cropping will occur because the current iPhone doesn’t allow you to photograph in a 5:4 ratio. This is a ratio — not inches. So a 5:4 ratio will print as a 4×5, 8×10, 16×20, etc.
If you’re going to print your image as a 4×6 then use the 3:2 ratio option. Again, these are ratios — not inches. So while you’re using the 3:2 ratio it will print as a 4×6, 8×12, 16×24, etc.
PPI
So, you’re shooting and cropping in the desired ratio but your images still look a bit fuzzy and out of focus when they’re printed. It could be the PPI or Pixels Per Inch. Generally speaking, a web-optimized image will have 72 ppi and a print quality image should have 240-300 ppi for the best quality image. When you enlarge an image with a low PPI too much you’ll start to see little jagged pixels and the image will look a bit out of focus.
Many, if not most, cell phone cameras shoot in a 72 ppi format. In fact, my new iPhone Pro Max 14 says it shoots in 460 PPI but even after adjusting all the camera settings the image information still shows it as 72 PPI. If someone who is smarter than me can explain that please let me know!
The only way to date I’ve found to increase the PPI in your image and thus ensure your enlargement will be a good quality print is to edit and export using Lightroom Mobile.
Here’s an excellent step-by-step guide to exporting your images from Lightroom Mobile for the best print quality: https://www.lightroompresets.com/blogs/pretty-presets-blog/how-to-export-from-lightroom-mobile
You can also use the Lightroom Mobile Camera app to photograph in high quality format but I will not address that here as it is my opinion that most amateur photographers would not be interested in that option.
Closing Thoughts
It has been my primary aim in these blog posts to help those who wish to enter their best images in the Montgomery Federation of Garden Clubs’ annual print competition. If others gained some helpful information along the way that is icing on the cake for me.
There are two disclaimers I’d like to emphasize here at the end of this series.
First, technology changes rapidly! I just got my iPhone 14 Pro Max and am learning the differences between it and the 12 Pro Max I had previously when they drop the iPhone 15 Pro Max! There’s just no way a post is going to stay current and accurate for very long. Please keep that in mind.
Second, I do not claim to be an expert in cell phones. That is one reason I’ve included links to articles from people who know a lot more than I do about using the cell phone to take photos. As I said in a previous post I’ve spent thousands of dollars and countless hours learning how to use a dSLR, so I rarely use my iPhone to take photographs. The majority of my camera roll consists of videos. So, if you catch an error or see that something should be added PLEASE post a comment or shoot me an email. I will not be offended at all!
It has been my pleasure to meet members of the garden clubs, judge the contest last year, and present workshops for improving cell phone photography. I look forward to judging the print competition again this year and offering another workshop to a different garden club in October.
Now get out there and practice! That’s the best thing you can do to improve your photography.